A couple weeks have passed since our first post in the series so by now you should be quite comfortable with the new folder hierarchy. And, since the folders have been indexed, searching for files should be a bit quicker also. That’s all well and good, but I could always find what I was looking for quickly when I already knew what to look for and where to look. So what do you do for all those times when you don’t know exactly what a file is called, or what the part number is? What then?
Solid Edge Custom Properties
If you haven’t been using them, now is a great time to start taking advantage of Solid Edge Custom properties. These are meta-data fields created by the user and can be found in the Custom tab of the File Properties dialog box. (Note: Custom properties are not unique to Solid Edge. MS Office files and other filetypes also have a Custom tab in their File Properties.) Custom properties can be used to fill out fields in title blocks and parts lists, as well as help you keep track of other informational bits about your design. And, more importantly, when added to the search index, can be used to find that part you’re looking for.

The default Custom Properties.
Custom properties can be anything the user desires. Therefore, there is a level of inconsistency with them. For example, the name of the property as well as the values within the field could be anything. Sometimes, even capitalization will be enough to define a different property. So how do you encourage consistency across all your users? Or, even for single users, how do you remember exactly what the name of the property was that you used on the last design? There are two places to define standard custom properties (standard for your organization, that is): templates and the propseed.txt file.
Standardized Custom Properties
The first, and easiest, method to create standardized custom properties is to define them in your template files. Open each template: assembly, part, sheet metal, and drawing; and Add a custom property. The default value needs input, so fill the field in with something that you know is a default value, or even a space or a dash. With the template saved, every new file created will have the custom properties pre-populated in the file.
The propseed.txt file is used to provide consistency to properties and values that aren’t saved to the templates. For the example figure above, notice that “finish” is the name and “nickel” is the value. These inputs are from a list of values generated by the propseed.txt file.
Defining and using Custom Properties can be a post on its own, and is out of context for this article. Solid Edge Help provides a useful source in learning more about them and I advise you to go there for more information. Just make sure that when you have them defined, each user points to the same templates and same propseed.txt file. This is done through the Solid Edge Options, File Locations tab.

The File Locations is where you setup all your users to point to your company standards.
Indexing Custom Properties
With the Custom Properties defined, we can add them to the search index. If your existing library of files doesn’t have the custom properties in them, this won’t help much. You will have to edit the existing files in your library or recognize that some parts aren’t going to show in the search results. But, all new files going forward will have their custom properties indexed and will show in search results for those fields.
The reason we created the Custom Properties in the templates and the propseed.txt file in the earlier step is because we can now use these to automatically add these fields to the index.
Back at the Fast Search Utility on the machine in which the CAD library is stored (the server), make sure the Custom Properties checkboxes are marked, and that both the Property Seed File and the User Templates are checked also. Verify the location of the propseed.txt and templates points to the shared location of your company.
- Then, click Set Custom Properties. (Note: Due to a weird glitch, you may have to press this twice for the properties to actually set.)
- Verify the custom properties are added by viewing them.
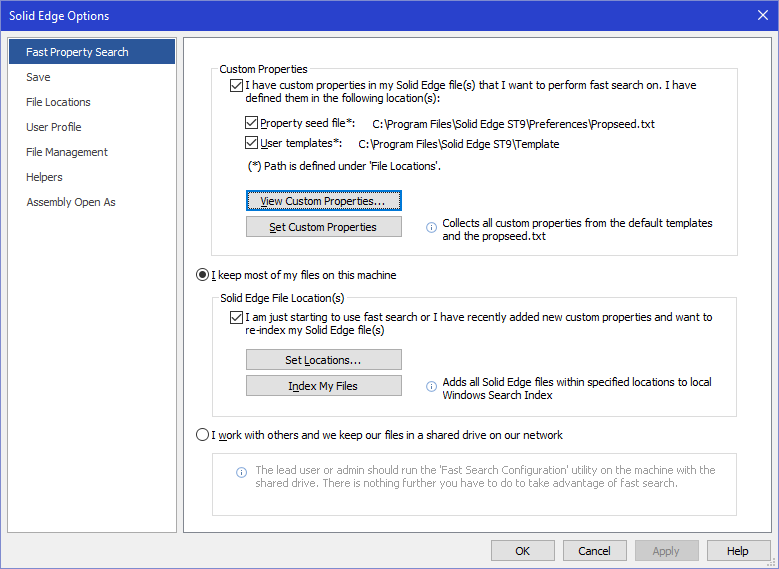
Set your custom properties to the search index. Verify they’re set by viewing them.
Now that more properties are available, the index must be rebuilt.
- Click on Index My Files.
Conclusion
That’s it! The server is setup and all your Solid Edge files are indexed, including all the properties that are available within Solid Edge. In the next posts, I’ll show you some more tools to maintain a clean library as well as tools available to each user, like fast Where Used and custom property searches, so they can start realizing some efficiencies in their design process.


