IrisVR Scope
I recently wrote about IrisVR (Virtual Reality with IrisVR). IrisVR builds virtual reality tools focused on the architecture and design-related industries. IrisVR offers two products, Scope and Prospect.
Panoramic in VR
With IrisVR Scope you quickly convert panoramic imagery into VR viewable content for smartphone devices. This includes utilizing GearVR and Google Cardboard. Generate the images using applications like V-Ray, Lumion, Autodesk A360, and others and then convert into VR with Scope. With the panorama converted, you view it virtually using your mobile device.
With the Scope Library you upload the “panos“, generate a code, and share the panos with whoever needs to see it.
The free version provides support for the Cardboard and Samsung’s GearVR. It allows you to view any pano shared with you. The Pro version ($40/month) gets you access to the Scope Library with unlimited uploads, the option to sort panos into sets, and fullscreen 360 previews.
Creating Panoramic Images
I am still very new to Virtual Reality. I learned that viewing panoramas on devices like Google Cardboard and the Samsung Gear VR requires images in particular formats, like Cubic Projection. What is Cubic Projection? It’s basically like laying out the image like orthographic views, placing the imagery along an unfolded box. The Cubic image is viewed from its center.
Revit, as an example, does not produce images with Cubic Project unless you generate a Stereo Panorama using the A360 Renderer and download it using the Stereo-Pano for GearVR option. With Panoramas generated from Revit (or other non-cubic images) you’ll need to use a combination of image editing software (like imagemagik) and a script to setup the image properly. Scope itself provides no conversion processes.
Scope supports 2×6 Stereo Cubic specifically for images generated from A360.

As mentioned, a combination of Revit plus the A360 Renderer provides a quick-and-easy method to generate panoramas and stereo panoramas. With selecting either Panorama or Stereo Panorama you set the quality, exposure, and desired width. The dialog updates to show how many cloud credits the render will cost. I threw a couple bigger Revit models at it and they all completed in under 10-minutes.

Creating Panoramic Images (3DS Max)
To generate Stereo Panoramas from 3DS Max it is a bit more involved, fortunately, the IrisVR blog provides the steps to generate the stereo panorama. Panoramas, however, are generated using the Panorama Exporter. Scope supports 1×12 Stereo Cubic for images generated by V-Ray.

I need to spend more time with the Panorama Exporter (as a V-Ray alternative) as the images appeared very “boxy” within Scope. It was clear that the image was laid onto a box and was not smooth at all. The biggest distraction is how the images were not connected and were offset at each corner.
So the best option for generating VR content from 3DS Max is also provided in the IrisVR blog. Using the tools from V-RAY, you add a V-Ray Stereoscopic Helper. This dissipates the “poles” meaning you don’t get the seams in the corners of the box. The V-Ray demo only allows rendering of small resolution (600 x 400 or less) so viewing within Scope was not the best experience. It was obvious the image was much better rendered for virtual reality.
Uploading to the Scope Library
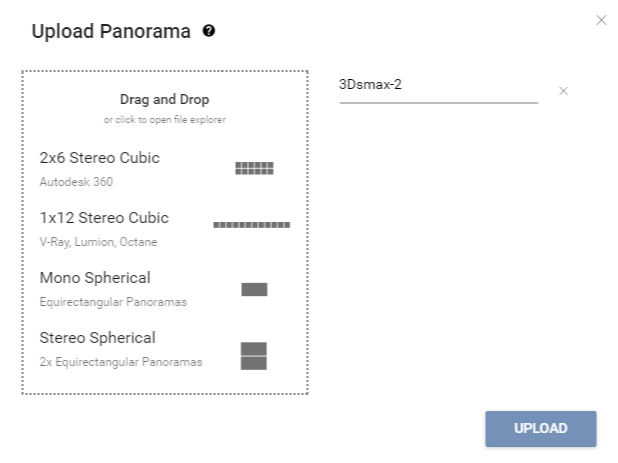
Uploading panos to Scope is quick and easy. From the IrisVR website you log in, switch to your Scope Library, and click Add Panorama Set. With the Set added, use the + to upload the panos.

Something very important when generating images is that Scope accepts pano dimensions 12:1, 3:1, 2:1, and 1:1. With 3DS Max you can set the dimensions from the exporter but within Revit you set the Crop dimensions from the view itself. Scope provides the supported dimensions on the upload screen, a nice touch by IrisVR to make sure the information is readily available.
There is limited information however when the pano doesn’t fit within the supported range. A simple message appears repeating the already stated supported dimensions. It would be nice to have a bit more information, even listing the current pano dimensions to make it a bit more clear on why it is failing.

I did have one image that for whatever reason would not upload. So I contacted IrisVR support and within a couple hours, we had a resolution (I’m not patient enough).
Utilizing Scope
It didn’t take me very long to appreciate the power of VR. The Revit models I viewed within the Scope app looked great, in fact, I actually squinted at the sunlight coming through the windows. “Looking around” using Scope is very smooth and I did not ever encounter any fragments or jerky movements. You are stuck however at the center of the view with no method to move.
It is also important to note that you must download the pano to your device. Scope makes this easy, even providing an option to only download on Wifi so as you are not consuming data on your cellular plan. However, it would be nice to have a view in cloud type option to eliminate this step.
Google Cardboard
To view the panos with the Scope app I used Google Cardboard. This is Google’s very affordable viewer for a “VR experience.” It is open-source, meaning Google readily provides the instructions on how to build your own. It’s called Cardboard as that’s literally what it is…. two lenses, within cardboard that you fold into a box. You stick your phone in and the supported apps provide the virtual reality content.
Final Thoughts
First off you can’t beat the price. Free for anyone you want to share with, plus easy access within the Scope app.
IrisVR brands the Google Cardboards they send out which is a brilliant strategy. With how well the models present within Scope I can definitely see situations where companies would send out the branded Cardboard to their potential customers. The customer then views the models within the free Scope app…. tough to beat this strategy!
At $40/month, the price for access to the Scope Library is very reasonable, especially when you consider you get unlimited storage. As you generate codes to share with others it is also very easy to control who has access to your data.
The upload process is quite simple and works as expected. It would be nice to have a bit more information on why images fail to load. Especially for newbies.
Viewing within Scope is also a simple process. My only complaint is that you have to download the pano. There is no view online option.
Pros
- Uploading images to the Scope Library is easy and you have unlimited storage
- Sharing is easy by sending a code (email, text, over the phone)
- Very reasonably priced (free to view, $40/month to publish)
Cons
- No option to view online, you must download the panos to your device
- Limited feedback on why images fail to load to the library
- No method to move within the pano.
A 30-day trial of Scope is available on the IrisVR website
*Disclaimer: IrisVR provided the Google Cardboard, but the opinion is my own. No influence from the IrisVR or payment was received for this review.