This weekend I was up to my neck in a problem with having to rebuild a fast and dirty project. It was built for pretty only. The problem was that a weekend build did not cover enough time to do the job right. Shortcuts lead to failures in Inventor.
I had constrained latches of a door in the door assembly, and then reversed my build and snapped the cut edges off the latch in the door part, and cut out the hole. It was fast and I didn’t need solid build, just fast. Hmmm, sounds familiar. Don’t have time to do it right, but always have time to do it over…. And do it over you will.
I started the job with a skeleton containing the global resources, and the overall shell. This worked like champ. Eventually as I began to run out of time, I started to cut corners. Portions of the projected geometry began to fail for one reason or another (because of the shortcuts). Everything was fine until I had to make a change.
So was tired of recreating my ‘shortcut’ doors, and decided to get a better shortcut. The latch plate had to recut for each change.

Use the iFeature to reduce repetitive steps
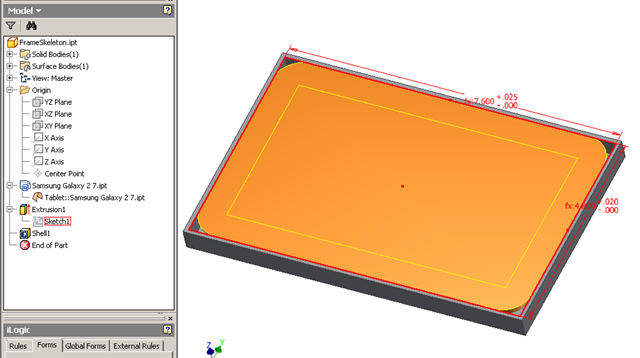
Rather than create it for the third time (eventually even I learn from my mistakes), I created an iFeature. This part however had no geometry and was just the solid model. Fine. I created a cut extrusion from sketched cut edges, an sent it out in all directions.


This is what I was left with. Perfect, as this will be the hole cut out in the door part. I extracted the iFeature, and then used it for the cutouts. Insert the iFeature onto the door, rotated accordingly, and poof. Instant cutouts.
Positioning the under constrained iFeature
The only problem with this method is the solid that was the basis. There is no constraint geometry. The feature is being held together by the references linked to the solid. What happens when the iFeature is extracted? The links are broken, and the geometry contained in the iFeature becomes completely unconstrained. This is a large problem when trying to constrain the iFeature on placement, as the feature begins to warp during the positioning process.
One option is to fix it for the future use. Reconstrain all the geometry, such that it is a useful tool for the future. I didn’t have time to do that , and you may not either. We need to constrain it, but how is the question.
After the sketch is created, the cut edges are referenced in. Break the links to the original solid. Then Auto Dimension the part. Sure the dimensioning will be crazy an not well conceived, but who cares. We need it fast. Auto-dimension will constrain out the DOF for us in a second. When that is done, create the Cut extrusion, and extract the iFeature. Oh, don’t forget; Don’t save the original part file. Otherwise that latch plate I was monkeying with would be junk.
For the permanent solution, well balanced Geometric and Dimensional constraints can be planned, including part sizing for other latches using the same base features. Then add in the additional placement features to allow automatic and adjustable placement.
iFeatures are a great way to cut down on repetitive steps, as well as preplanned features that can be well catalogued for future use. Once you get past the fast fix, it would be a good idea to go back and recreate the iFeature with the permanent solution. If you used it once, you might end up using it numerous times.
Creative Inventor
Don’t forget we will have great instruction, troubleshooting, and exercises for iFeatures in the Creative Inventor series at Tekni. As other lessons become available, we will add them to the course selection.
Tekni web site