
Vault 2016 puts me into a difficult position. For those of you who moved to Vault 2015 R2, the majority of the new features contained within 2016 you’ve already seen. For those (like me) who stayed on 2015, there is a lot new in 2016 as you didn’t use R2.So the dilemma…. do I blog about 2016 like it is all new? and just ignore 2015 R2 existed?
What I’ve decided to do is write about the 2016 features assuming that you’ve never seen them (as in never seen 2015 R2 or 2016), however, I will try to identify all things that have changed within 2016
The new and improved Copy Design is so significant Autodesk now labels it as an “Experience” (ed: Very ‘Dassault’ of them!). If you haven’t seen it yet, you will probably be a bit shocked by how significantly different it is. I’m labeling the 2016 Copy Design as version 2.01, as 2015 R2 introduced the new “2.0” Copy Design and 2016 only slightly tweaks it.

photo credit: JOH_1143 via photopin (license)
Allan O’Leary is doing a very, very, very deep dive of Copy Design over at Under the Hood. Its a very good read as it is both informative and fun, in a way only Allan can. My post however, is not the “long and short of it”, it is only the short. It is the meat and potatoes of Copy Design, meant to give you my impression and get you up and running in no time.
Copy Design 2.01
I should start by saying that for anyone using Vault Basic, you will continue to use the 2015 Copy Design. The new Copy Design “Experience” is only available for Vault Workgroup and Vault Professional users.
So what was so wrong with the old Copy Design?
There are many things about the old Copy Design that I liked. It was easily accessed, it autoloaded the file I had selected and its children. It was easy to tag components with the actions I wanted (after I learned the hold CTRL to toggle all trick). It also had a flow and feeling that didn’t make me feel like I was leaving Vault for something else… it was a part of Vault.
Copy Design however, is not always the most intuitive. For example, Find and Replace is available but only if you know the magical sweet spots to right-click. It also becomes clunky when you start getting into large datasets. It’s clunky as it’s difficult to navigate to find the items you want copied, the ones you want replaced, excluded, etc.
The New UI Experience

The User Interface (UI) is completely overhauled allowing for more feedback, user customization, and different sorting (ed: while nice, it’s yet another Vault UI variant). Although some similarities in workflow to Get / Checkout, it really is a different experience. Although it can be launched from within Vault [new to 2016] it is actually a standalone application. You can additionally start Copy Design from the start menu.

Copy Design now supports more than one dataset at a time. It also supports AutoCAD Electrical Projects (finally). It also now works on non-CAD files… meaning any file stored within your Vault is eligible to participate in a copy design.
Although standalone the window behaves as other Vault windows. The displayed properties (columns) are adjusted by dragging-and-dropping. If additional properties are required (desired), right-click on any column and use Choose Columns to add or remove properties. The view is persistent, meaning it will be as you left it the next time you use Copy Design.
A nice bonus feature which would be nice at times in other windows, is the right-click options for a quick expand-all or collapse-all. The expand options include 2-levels, 3-levels, 4-levels, and All options.
Other new features:
- copy individual instances (opposed to all instances)
- replace parts with copies that were created during the active copy
- configure different actions for drawings
- use circular references, such as substitute parts and drawing overlays.
The copying process has been completely restructured which should lead to much greater performance. With the previous version files were copied local to your system (into the temp) for the magic to happen (copying and renaming) and then checked back in as the new files. Although this happened invisibly to the user it was still time consuming, especially the file transfer back-and-forth between your system and the server. The copying now occurs completely on the server leading to greatly reduced copying times, significantly improving performance.
The Workflow
If you launched Copy Design from the Vault client your dataset is already loaded, or at least the start. If you required more data or if you launched Copy Design standalone use the big plus sign icon in the toolbar to browse for and select files to include in the copy operation. One caveat is there is no search, that’s right I’ll say it again, there is no search using the add file option within Copy Design…. it’s straight up browsing file structure (maybe Copy Design 3.0?)

Use Add Children (in the ribbon) to quickly add attachments and Library files.
To remove drawings from the view, disable Drawing Views from the application menu. Enable Automatically Copy Parents so that as you select a component to copy its parent is automatically selected. Disable Select References when you only want to copy the instance of the component, not all references of it in the assembly.

Right-click on the components in the list to set the action. The available options will vary on the component level and the file type. The options include:
- Copy: Toggles the component to copy creating a new file in the same location as the original
- Copy To: Similar to Copy but you will be prompted to select the destination folder for the new copy
- Copy Branch: Sets the action to Copy for the selected item as well as all of its children
- Replace: Browse for and select a replacement file
- Reuse: Is the default action and can be used to remove an action like Copy
- Reuse Branch: Sets the action to Reuse for the selected item as well as all of its children
- Exclude: removes the instance from the new copied assembly
Use the new Actions panel to quickly filter out the files with the assigned action. For example, selecting the “Exclude” tab displays just the files set with the exclude action. The action of the files can be toggled via right-click in these views as well. This has proven to be a great way to check what I’m actually copying and other actions and make adjustments… especially opposed to navigating up and down the navigation tree with larger assemblies.. Remember that nothing is committed until you click the Create Copy button, which is when it initiates the copy process.
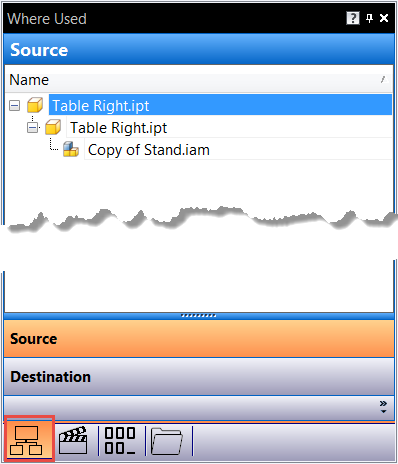
The Where Used panel provides a Source and Destination option to quickly see where the files are coming from (Source) and where the copies are going (Destination). Because you can copy individual instances (now) a particular component might have multiple destinations.
Use the Folders Panel to review the source and destination folders of the copied data, a different view of the Where Used Panel. This shows where the copied files are going, so you can insure they end up in the correct location. As a bonus, you can apply operations based on the folder location. You can also drag-and-drop files between folders or from the main view to add to the copy.
Using the Numbering Panel
The biggest change, and most likely the one that takes the most to get used to, is the Numbering Panel. You do not adjust the name of copied components from anywhere BUT the Numbering Panel. The Numbering Panel lists the files to be copied and is what you use to set the new names. This Panel displays tabs for each numbering scheme used within Copy Design. It organizes the files based on the scheme applied.

With files with no scheme applied, you can manually adjust the destination file name, apply a prefix (before the base name) or postfix (after the base name). You can apply changes to the three (pre, post, and base) on a selection of files. The options presented on the specific numbering scheme tab is completely dependent on the numbering scheme.
In Summary
Vault Copy Design 2.01 is a case of the good, the bad, and the ugly… well, not quite as it is more of the great, the good, and the bad.
Great is the new features like multiple datasets, AutoCAD Electrical project support, and copying instances opposed to all references.
Good is some of the workflow items like the action panels, the right-click expand options, and the exclusion of drawings from the view.
Bad is the separate window, with its look & feel and workflow different from all other features in Vault. When you launch Copy Design, it truly does feel like a standalone, separate product from Vault. Inconsistencies in software workflows make it difficult for new users to learn and difficult for users who don’t use the feature all the time to be productive.

photo credit: Vintage 80s 8-Bit Scottie Dogs Tacky Ugly Christmas Sweater via photopin (license)