In case you have not seen it yet, the (subscription-only) Inventor Design Checker tool is a potentially massive time saver when it comes to checking on the conformance of modelling data to a known (company) standard.
I will not be covering how to use/set it up here since the instructions can be found (in brief) online or in detail in the accompanying help (.chm format) documentation, but suffice it to say it’s really easy to check a whole plethora of common modelling errors/omissions.
I have previously posted about my desire to use the Inventor Design Checker (IDC) to check pre-existing model datasets using this tool, but, if you have used the tool already, you will notice that it has one (to me at least) fatal flaw with the inability to batch process (existing) large assemblies and sub-assemblies.
Because of this flaw, I had ignored the tool for over a year when a series of events led me back to discussing it with the very knowledgeable Adrian Salariu. I praised his post on Inventor Pipe Clips and he then replied to my Google+ post on the subject of the IDC stating that he had previously used it to check a large assembly structure without using iLogic or the API.
We subsequently discussed this further using Google Hangouts and, after understanding how Adrian had accomplished this seemingly impossible goal, here is my guide on using the Inventor Design Checker for batch processing large assemblies:
Preparation for Batch Processing with Inventor Design Checker
There are a huge number of checks that available to use with this tool, and whilst there are too many to mention in detail, the one issue we encounter more than any other in provided-to-us Inventor datasets is “under-constrained-sketches”.
This error ranges in severity from one or two dimensions/constraints missing within one sketch in a part file to (the worst I have seen) 150 of 180 sketches being under-constrained within one part file.
Obviously in the latter case, the only option left to us was to take the original paper drawing data and re-draw the Inventor part from scratch as attempting to piece together a part with around a 70% broken sketch count was simply a non-starter.
Once you have agreed upon a set of company standard checks that you wish to run, the procedure for running the tool as a batch process is relatively simple.
Ensure that “Enable LiveCheck” is selected:

Then double-check the profile you wish to use:
(In my case remembering to turn on the previously mentioned “Under Constrained Sketches”)

Also remember to add Default iProperties you wish to have checked:

Save and exit the Design Checker Profile tool, then close Inventor.
Now we need to think about the origin of any files we wish to check, since there are a number of pointers I have discovered that could shape the way you use this tool:
- Are the files Vaulted?
OR
- Are the files part of a pack and go?
OR
- Are they included on an email/CD/DVD?
If the answer to the above is a. then skip to (Vaulted Files).
If the answer to the above is b. then skip to (Pack & Go Files).
If the answer to the above is c. then read on:
In the case of emailed/DVD-based files, simply place them somewhere within your existing Vault folder structure.
Make sure to unset Read-Only on these files and (to prevent missing file errors) open their parent assembly with Inventor. This ensures that (if Inventor is unable to find them) Inventor will download the latest copy of any Content Centre files referenced by this assembly.
Once again, close Inventor and skip ahead to (Processing files using Task Scheduler).
Vaulted Files
Vaulted files can be treated similarly to number 6) above, but with the caveat that if they are in a lifecycle-released state, the IDC results will not be saved to the files in the Vault.
If non-saving of the files is not an issue, for instance if you simply want to report on pre-existing, Vaulted, locked files, then simply do a “Get” at the parent assembly (remembering to tick the “Children” option) and download the latest files from Vault. Then unset Read-Only and open the parent assembly as per step 7 above.
Pack & Go Files
Pack & Go Files should already be writeable, but it is best to check as the IDC will fail on any missing or read-only files and repeated failures will result in the process stopping completely.
Depending on the settings used when creating the Pack & Go, there may or may not be included the relevant Content Centre files, so it is worth setting the Pack & Go project file as current and opening the top-level assembly to force Inventor to get all missing Content. (Of course, Inventor may not be able to retrieve some items in which case an email to the Pack & Go source is likely required.
Processing files using Task Scheduler
With all the necessary files downloaded and ready to be processed, open the Inventor Task Scheduler from the Start Menu -> All Programs -> Autodesk -> Autodesk Inventor (year) -> Tools -> Task Scheduler.
Create a new “Update Design” task:

If you can’t select a project file, then simply select a folder to use, or even an assembly file:
Then tick the “Immediately” (Assuming you want the task to run straight away!):

Next, click “Options” and tick the “Total Rebuild” option. (This may or may not be necessary, it was something Adrian & I discussed and we agreed it was probably best to turn this option on):

Finally click OK to close the Update Design Options and then, if you are happy with the settings you have selected, click OK on the Update Design dialogue.

Awaiting the Task Scheduler results
Once the process is running, you will see different “speedometer” icons appearing on-screen whilst the task completes:


These different icons display the different checks that have passed/failed within the IDC dataset.
Once the task has completed you will see something similar to this page:
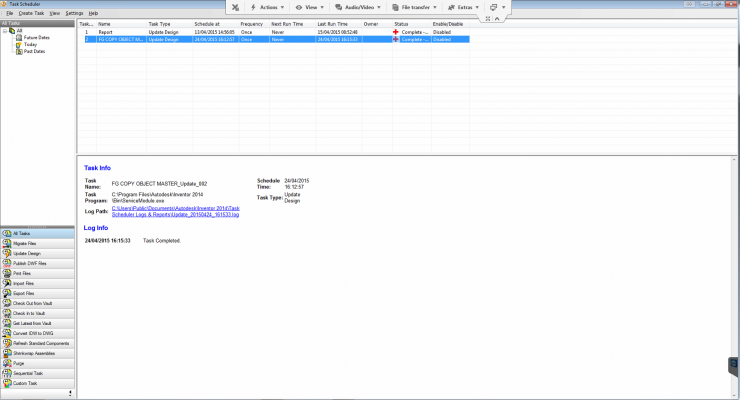
The “Red Cross” denotes that the task completed with some errors. In the case above, the most-recent task only had three errors:

Now it is simply a matter of right clicking the completed task and selecting “Create Report”:

Then select the filename/path for the report and click OK:

The report will open and because we ticked the “Errors Only” option will only display errors from the Task Scheduler process:

With the Scheduled task complete, we can now reopen Inventor and begin to interpret the IDC Results.
Inventor Design Checker Results
Open the top-level assembly checked by IDC and you will see the speedometer as shown below:

The number displayed within shows the number of files that have failed checks. Ideally, this would be zero, with the dial(s) fully green as per this part:

The exclamation marks shown in the image above are highlighted within the report as “Accepted Failed Checks” and have accompanying remarks from the user (in this case me) explaining what the Accepted Failed Check means.

