Part 1 – A Word about Parametric Analysis
Part 2 – Model Preparation
Stress Analysis
Continuing the discussion of design and CAD tips taken from the GrabCAD design contest, today’s topic will be focused on the stress analysis environment in Inventor.
Stress Analysis
While using stress analysis is fairly easy, there are a load of options and possibilities that can be overlooked. The things I want to discuss are:
- Check your mesh
- Making copies of your analysis
- Filtering Assembly Analysis
- Analysis Throughout the Design Process
Check your Mesh !!!
The entire process is run on a mesh that is developed from the component model, not the model itself. Inventor employs an H-P mesh that’s fast and adaptive, but it’s not going to size the mesh for you. Ignoring the mesh is like eating something that someone else made, and not looking at it first.
Turn on the mesh view (button on the Stress Analysis Ribbon), and update the mesh if necessary. ![]() (The little red lightning bolts appear next to items that need to be updated.)
(The little red lightning bolts appear next to items that need to be updated.)
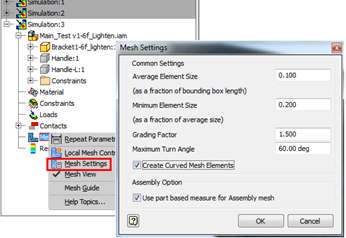
Look at the smallest faces, curved areas, and regions where features merge. Also the longitudal faces that will bear compression are important. You need to ensure the mesh is properly aligned and distributed in order to measure the accumulated stress in those regions.  To adjust the mesh sizing, use the ‘Mesh Settings’ from the Mesh Context menu.
Further discussion of Inventor meshing and setup will be forthcoming, where it can be discussed in greater detail. I however did want to point out some basic things here.
- If you have a model that is primarily curved, you MUST check the ‘Create Curved Mesh Elements’ option.
- Evaluate the mesh in the lower and upper range of your parametric instances, not just the default instance that is meshed first.
NOTE: Mesh and Analysis are areas that require substantial amounts of study and understanding. While Autodesk has made these features easier to use, serious considerations should be made prior to depending on the results.
The mesh is adaptive to a feature’s size and contact surfaces. Keep this in mind when evaluating your mesh settings on parts that will have features added in and removed repeatedly.
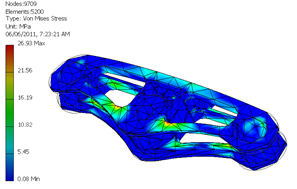
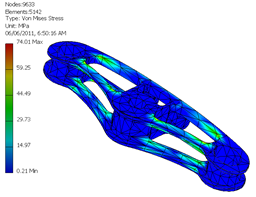
Let me show you an example that might help you see how important this is. In the following images I’ve incorporated the default Inventor settings, average 0.1 / minimum 0.2, 1.5 grading factor, and 60° minimum angle. Model fillets have not been applied either.
Look at the difference in the mesh. While the one on the right is quite rough, and incapable of accuracy in certain aspects of analysis, the one on the left is a tragedy, and should immediately prompt anyone to check their settings. The results are considerably different, and should hopefully command a little respect, even when performing a fast set of approximations. If you review your mesh, you might miss something this simple, and the analysis would be pointless.
Moving ahead, the same settings are held, but watch what happens to the mesh.
Inventor reacts to the features as they are incorporated into the model being analyzed. I used numerous mesh settings and refinements to verify the model I submitted (more on that later).
Using this staged approach I harnessed Inventor’s adaptive meshing to my benefit: In the beginning the feature complexity was reduced, and Inventor dropped the detail in the analysis accordingly, and as a result, the accuracy dropped in favor of speed. As I added features, Inventor increased the feature detail accordingly, and as a result, the accuracy increased, as well as a proportionate amount of time spent in analysis. This increase followed suit with my intended design plans. Start rough, and use the analysis through each phase of the design to steer towards the final acceptable product.
The things I want you to take away from this are:
- The Inventor Mesh needs to be reviewed whenever changes are introduced to the model.
- The mesh is highly adaptive, and while this is a good thing, no single mesh setting or approach is going to function properly with every model.
- Know that the rougher the mesh, the overly liberal, insufficient, and misleading, are the results of the analysis.
Copy your Analysis
Once I was satisfied with the meshing, the Parametric Dimension Analysis was run, and Inventor delivered an approximate range of reasonable parameters to work through. Since this process is slow, and I now had the design I wanted to move forward with, there was no sense in analyzing arrays of model parameter variations.
I simply copied my Parametric Analysis, and all of the constraints and force settings with it. Now new and more defined analysis can be accomplished without destroying the previous results, and I don’t have to recreate the forces and constraints. This is a real time saver !! It is so easy to change the Simulation Settings to ‘Single Point’, and move forward.
Filtering Assembly Analysis
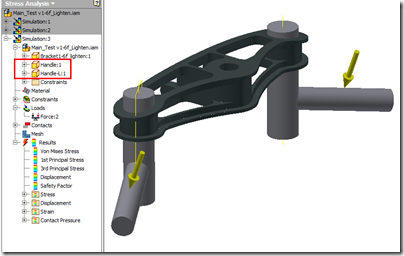
 I applied the forces in a couple of variations. All of these needed the offset of the handlebars in order to accurately calculate the forces that would be incurred throughout the model due to torque. This was quite easy to do by mocking up the handlebars and applying the forces to these in an assembly environment.
One nice feature is that we can turn the visibility of these on and off, and still include them in the calculations. Inventor handles all the meshes as separate models.
This gets even better when viewing the results. In this case, more stresses were applied to the handlebars than the bracket, and the results peaked with the handlebar meshes shown. However, when the handlebars were turned off, the results filtered down to only those that applied to the bracket making evaluation of the bracket quite easy.
Note: This ‘filtering’ only applies to Single Point Analysis. Parametric Dimension analysis will report values for the entire assembly combined.
Analysis Throughout the Design Process
The entire process I discussed here revolved around analysis results. From the base frame sizing to the final corner rounds, everything was developed using these analysis results to steer the component design, and avoid wrong turns that could have resulted in substantially heavier component.
While many experts feel that having FEA integrated in CAD applications is a bad idea, they do contend that FEA should be part of the design throughout, with results introduced back into the design process regularly.
So, reinforcing the design process with FEA is good, but having the analysis and the design together is not !!??? I can’t figure that one out.
Inventor doesn’t figure it all out for you. It however does provide the tools that analysts and engineers need to evaluate just about any static stress that might be applied in a situation. Check in again for detailed articles on Autodesk Simulation related products here at Design & Motion


