
In the first part of our deep dive on dynamic blocks we explored the benefits of dynamic blocks, how they are created, and how to use parametrics to drive the dynamic block configurations. In this post lets look at an alternative to parametrics… parameters and actions. Parameters and Actions actually came first. Before AutoCAD had parametrics, this was the only way to create dynamic blocks. Using Parameters & Actions has pros and cons and when to use this over parametrics is really based on the situation, the geometry, and the desired results.

1963 Oldsmobile Dynamic 88 Fiesta Station Wagon by Alden Jewell
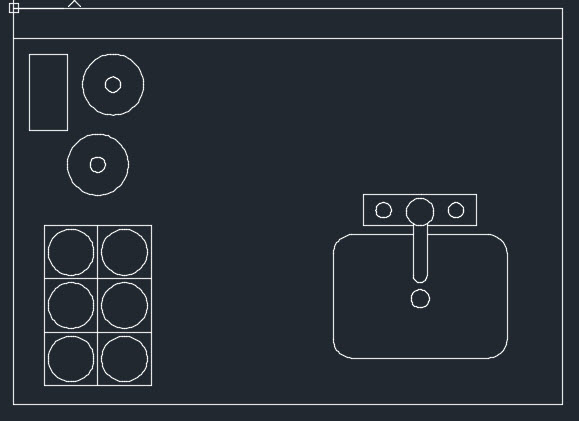
Lets use the Wet Bar block included with the AutoCAD samples. I want the ability to size the width and depth of the block. I want the option to move the bottles and glasses around on the surface. To finish the block I want the option to rotate the faucet on the sink
Think of Parameters as the nouns, defining the subject of the change. The Actions are the verbs, defining what’s actually going to happen. Parameter Sets are just the combination of specific parameters and actions. “Canned” shortcuts to simplify the process.
To apply parameters and actions you’ll need the Block Authoring Palette. If its not currently visible select the Authoring Palettes button in the ribbon > Manage panel

To set up the block to allow the stretching of the width and depth we require two Linear Parameters. The act of applying the Linear parameter is similar to adding a linear dimension… pick two points and then the location for the parameter. Order here is important, but only if you want one grip to appear opposed to both ends.
With the Wet Bar I want the grips to modify the size of the block in the upper right-corner. When creating the horizontal parameter I pick the left side first, then the right side. With the vertical constraint I pick the bottom first then the top point. The results look similar to this

Don’t be concerned about the yellow exclamation marks at this point as these are warnings that there are no actions associated with the parameters yet. To see this just roll your cursor over one of the yellow symbols.
If we try the block at this point the grips so not appear, however, before we assign the actions lets explore the parameters properties.
The name Distance1, Distance2 really doesn’t mean much…. plus if we end up with multiple Linear Parameters it will get confusing on what each one is controlling. Using the Properties Palette I’ve adjusted the Distance name to be Bar_Width and Bar_Depth. I’ve also appended Distance descriptions to help explain the parameters purpose incase I am not always the one making changes. As a bonus the description will appear as a tooltip for anyone using this block.

Linear Parameter Properties
In the Misc section of the properties are options to tweak the Base location, Property Display, Chaining Actions, and the Number of Grips. Base location in this instance will remain Startpoint, but the Midpoint option is good when you want to make symmetrical type adjustments. With Show Properties set to Yes the Parameter will appear in the Property Palette when the block is selected meaning you can adjust the size of the parameter from the property palette. Finally I’m going to adjust the Number of Grips from 2 to 1 as I only want the user to adjust the size of the block from one end
Using the Value Set section I will apply an increment restriction so that the Width can only be adjust in 2-unit increments. The minimum will be 36 (the current width) and although optional I will set the max at 72. With the Depth I will configure a List with the options for 26, 32, 48. and 62.

Now that we’ve decided how we want it to change lets actually make it do something. Switching to the Actions tab on the Authoring Palette I see many options, but in this case I want to apply Stretch. This highlights one of the advantages of parameters / actions over parametrics, I do not need to worry about constraining and dimensioning each and every object involved in the action, a simple crossing window will take care of it.
The process…
- Start Stretch
- Select the Parameter to apply the action
- Select the grip to apply the action.
- Define the Stretch Frame Window
- Select the objects to be affected by the stretch
The Stretch Frame does not define the objects to be stretched but the parameter and grips that are required for the stretching action. It can be selected as a window or crossing. As this is a stretch action any object you want stretched and not moved needs to be selected by a crossing window.

After applying the stretch to both parameters we’re ready for testing. I do not need to apply the stretch action to both ends of the parameter as I already reduced the number of grips to 1 and I only want the user to adjust it in one direction.
What about Actions and their properties?

The Action Name is a good idea to change, especially as you could end up with many actions in the dynamic block and without proper names it may be difficult to determine the one to modify. The Selection Set is a method to alter the objects included in the action, both add and remove. The Distance multiplier and Angle Offset do as they describe, override the amount the action applies to the selected objects.
So we have a Width and a Depth but we don’t really want this wide open for any combination of sizes… say the Wet Bar is only available in a select few size configurations, so we should only provide these to the user. The Process to take:
- Adjust the number of grips on the Linear parameters to 0 (we don’t want the user of the block to grip edit the size)
- Adjust the Show Properties value on the Linear parameters to No (we don’t want the user selecting whichever size they want)
- Add a Lookup Parameter (sets the location of the grip)
- Add a Lookup Action to the Parameter and define the size configurations


The way the Property Lookup Table works is the parameters you wish to control are added (via Add Properties) to the left side of the dialog. The size combinations are set here. On the Right side the name of the configurations are set. This is text which can be whatever you want. The result is something like this….


