Civil 3D | 2012 New Feature Highlights Part 2
Autodesk AEC Division unveils many of Civil 3D’s best new features. Check out Part 2 of the the highlights for the second half of the new features webcast.
Read More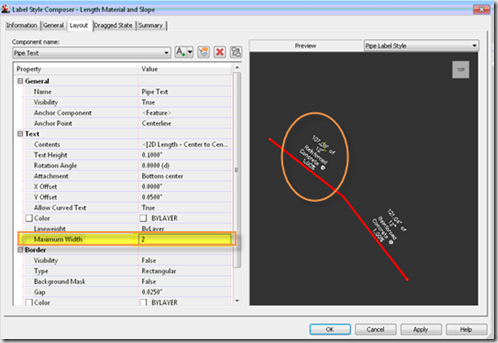
Autodesk AEC Division unveils many of Civil 3D’s best new features. Check out Part 2 of the the highlights for the second half of the new features webcast.
Read MoreCivil 3D is the king of the hill for Civil Design, and can develop elegant and detailed...
Read MoreWhen Dragging Pipe Network Structures you may notice that the Rim Elevation Changes. Sure the Rim...
Read MoreWe often do not create any Pipe Networks to represent the existing utility mains in a...
Read MoreNOTE: I have revisited this issue and article 4 times over now. I am rewriting this…again…,...
Read MoreBack to Part Builder Part 6 In the last session we created the Structures in the Civil 3D...
Read MoreWe will pick up where we left off from Part Builder Part 3. Open our saved part “Wingwall...
Read MoreWe will pick up where we left off from Part Builder Part 2. Open our saved part “Wingwall...
Read MoreToday we continue from where we left off in Part Builder Part 1. Before we proceed, I’d like...
Read MoreI started a new Certification study project, and came up with the desire to grade a corridor over...
Read MoreCheck out this tutorial series on using Autodesk Civil 3D Part Builder to customize you own structures and pipes.
Read MorePipe Networks and the beloved XML has once again bit someone in the fanny. This time it is the...
Read More